I am re-reading Ayn Rand's epic novel Atlas Shrugged. I first read it about 10 years ago and its ideas had a profound impact on my world view.
About 5 years ago, I started rereading it, but got bogged down and didn't finish it. I should point out that I am not a voracious reader. I would usually rather be doing something hands-on, such as welding, playing a Beethoven sonata, or knitting. Lately, I have been trying to make an effort to read more, as it is an excellent way to learn new things and broaden one's horizons.
Earlier this spring, I started rereading Atlas again, after I discovered Diana Hsieh's excellent webiste: Explore Atlas Shrugged. She has a whole series of discussion questions and podcasts on the novel. Then, a couple of weeks ago, I discovered a Meetup Group in Pasadena that is discussing the book. The group meets on Tuesday nights and is also using the Explore Atlas Shrugged discussion questions. Since they were about to meet and discuss chapter 3, and I was only on chapter 6 myself, I RSVP'd and went.
The group meets at a wine bar, which is an excellent place for hanging out and discussing a great novel. There were about a half dozen of us. Most are re-readers but there was one person who is reading it for the first time. I hadn't reviewed chapter 3 prior to the meetup, ( I had a job interview come up somewhat suddenly, and preparing for it had to take priority,) and nearly revealed a plot point by accident, but I caught myself just in time.
I think it would be more interesting if there were more first-time readers in the group. To that end, I lent a friend an extra copy of the book. He may join us, although he can't make it this week.
Tonight we are meeting to discuss Chapter 4. I am going to make sure I skim the chapter again so that I can participate a more fully. As part of the discussion each week, we go around the table and each person gets to read their favorite passage or quote, and explain why they liked it. It's neat to see what people's favorite quotes are, I'm looking forward to that part in particular.
Stay tuned for more discussion of the discussion of Exploring Atlas Shrugged!
Tuesday, May 25, 2010
Thursday, May 20, 2010
Yet Another Homemade Yogurt Tutorial
I have been making my own yogurt for a while now, and highly recommend it. I first learned how based on this tutorial. The beauty of this method is in the heating pad.
Usually, yogurt recipes/tutorials tell you to put the warm milk and yogurt starter in the oven, and let the pilot light warm it. My problem is that I don't have a pilot light on my oven. And I'm not about to go cluttering up the place with a yogurt maker.
I'm actually kind of looking forward to being able to make yogurt in August and September and just leave it out at room temperature (I live in L.A. and have no air conditioning. At least yogurt making will give a little bit of productive purpose to all the misery of living in triple digit heat 24/7.)
I have made yogurt by this method so many times that, at this point, it is a pretty easy routine for me:
1. Set it up before bed,
2. Let the yogurt culture overnight,
3. Transfer it into the strainer the next morning and refrigerate,
4. Let the whey separate out during the day,
5. Move it into a storage container(s) that evening.
So, although it takes about 24 hours, it is really just 5 simple steps, as you can see above. Actually, 2 of the 5 steps don't even involve any action on your part. Also, I am giving you the instructions for my method of making yogurt. Feel free to consult any of the gazillion other web tutorials on the topic and mix and match or adjust the method to suit your own needs. It is really a very flexible process, and those yummy little cultures don't need much more than a little bit of encouragement to do their thing.
Here are the supplies you need:
So, let's see how it's done!
1. Set It Up Before Bed
This week, I had consumed some of the milk already, but happened to have some heavy whipping cream on hand. I added it to the milk, and I think I will make that a regular part of the process, because it transformed the yogurt from really really good, to absolutely heavenly.


Use low heat. Heating the gallon of milk to 100 degrees usually takes me 15-20 minutes. Stir it about every 5 minutes.
Use your thermometer to check the temperature. I have a candy thermometer that I use:

Like I said, you want the temp around 100. If it goes over a little bit that's ok. If it accidentally boils because you are distracted reading blogs in the other room, it's still ok. You just have to let it cool down.
Here's how I think you could get it to work without the precise thermometer temperature reading: body temperature is pretty much the same as yogurt culture temperature. Your body is 98.6 and the yogurt needs to be around 90-100 to work. So, if your hands are at normal body temperature, and you stir up the warming milk and stick your finger in it, and it feels just barely warm, but not cold and not hot, you are probably close enough to the right temperature. Also, remember that the real action takes place with the heating pad overnight. The stove part is very preliminary.
Like I said, the low flame shown above takes about 15-20 minutes, with occasional stirring, to warm a gallon of milk from 'fridge cold' to 100. I will probably quit messing with the thermometer at all after a few more yogurt-makings.


Then, I transfer the pot of warm milk/cream over to the counter where I have set up the heating pad. I use a large cutting board and lots of extra towels in between all the parts. I'm all about protecting my countertop from the heating pad, even though it doesn't get that hot, really. I set the heating pad on medium.
 Mix the starter:
I take the last bits of yogurt from the last batch I made and scrape it all up with the spatula. You only need a couple tablespoons, or no more than a 1/4 cup.

Add a cup or so of the warm milk from your pot and mix it up:

Pour the starter into the pot of warm milk/cream and mix it together:

Then I cover it with a couple more towels just to tuck those yummy little cultures in for the night, and then I go to bed. Or go read blogs for a while.

And you're done with Step 1! Easy!
2. Let the Yogurt Culture Overnight
When you come downstairs in the morning, it should look something like this:

My thermometer tells me that we're holding steady at right around 90 f.

And you're done with Step 2 - super easy!
3. Transfer it into the Strainer and Refrigerate
Here's where it gets interesting. My basic strainer setup is as follows: I have a large colander, which I prop up on some little supports I made from cutting up a bamboo chopstick. This is an optional step, but I think it helps the whey drain out more easily. Don't agonize over it if your colander is just sitting on the bottom of the bowl or dish. It will be fine. Trust me.

Line your colander with the thin cotton towel like this:

and then pour in the yogurt:

If I start with a full gallon of milk/cream, it just comes to the very top of my colander. Here it is a bit below because the gallon wasn't a full gallon at the beginning. They whey starts immediately streaming out:

Now the whole thing goes into the fridge, and you're done with Step 3.
4. Let the Whey Separate out During the Day
Here's what it looks like several hours later:

Look at all the whey that has separated out! Oh, and here's an important tip: tuck the ends of the towel into the dish, otherwise, through the miracle (not really) of capillary action (I think), the towel will wick the whey out of the yogurt and dribble it all over the inside of your fridge.
5. Move the Yogurt and Whey into Storage Containers
Now it's really thick, and at the same time ultra smooth and creamy. These photos don't do it justice.


Then it's just to transfer it into containers and enjoy!

I have also found some other links on making cream cheese, and sour cream, that I would like to try out. And here's one on home made ricotta cheese. I once tried making ricotta from all the leftover whey and it was a massive fail. These days I make protein smoothies with the whey and some protein powder. Given how fabulous this super thick yogurt is, it seems kind of anticlimactic to not have something just as amazing to make with the leftover whey. So, as I said earlier, if you have a way with whey, please share it in the comments.

Usually, yogurt recipes/tutorials tell you to put the warm milk and yogurt starter in the oven, and let the pilot light warm it. My problem is that I don't have a pilot light on my oven. And I'm not about to go cluttering up the place with a yogurt maker.
I'm actually kind of looking forward to being able to make yogurt in August and September and just leave it out at room temperature (I live in L.A. and have no air conditioning. At least yogurt making will give a little bit of productive purpose to all the misery of living in triple digit heat 24/7.)
I have made yogurt by this method so many times that, at this point, it is a pretty easy routine for me:
1. Set it up before bed,
2. Let the yogurt culture overnight,
3. Transfer it into the strainer the next morning and refrigerate,
4. Let the whey separate out during the day,
5. Move it into a storage container(s) that evening.
So, although it takes about 24 hours, it is really just 5 simple steps, as you can see above. Actually, 2 of the 5 steps don't even involve any action on your part. Also, I am giving you the instructions for my method of making yogurt. Feel free to consult any of the gazillion other web tutorials on the topic and mix and match or adjust the method to suit your own needs. It is really a very flexible process, and those yummy little cultures don't need much more than a little bit of encouragement to do their thing.
Here are the supplies you need:
- A gallon of whole milk
- Optional: extra pint or quart of heavy whipping cream
- A pot to warm it in, with a lid
- A thermometer (although, if you are brave, you could probably get it to work without this - read on)
- Some yogurt starter. I use a little bit from my last batch, or Greek Gods Yogurt if I need a new starter.
- Optional : a large cutting board
- A heating pad
- A collander
- A lightweight cotton kitchen towel
- A few extra towels
- A large baking dish (a bowl would work)
- Storage containers for the delicious yogurt and whey you are going to end up with.
So, let's see how it's done!
1. Set It Up Before Bed
This week, I had consumed some of the milk already, but happened to have some heavy whipping cream on hand. I added it to the milk, and I think I will make that a regular part of the process, because it transformed the yogurt from really really good, to absolutely heavenly.


Use low heat. Heating the gallon of milk to 100 degrees usually takes me 15-20 minutes. Stir it about every 5 minutes.
Use your thermometer to check the temperature. I have a candy thermometer that I use:

Like I said, you want the temp around 100. If it goes over a little bit that's ok. If it accidentally boils because you are distracted reading blogs in the other room, it's still ok. You just have to let it cool down.
Here's how I think you could get it to work without the precise thermometer temperature reading: body temperature is pretty much the same as yogurt culture temperature. Your body is 98.6 and the yogurt needs to be around 90-100 to work. So, if your hands are at normal body temperature, and you stir up the warming milk and stick your finger in it, and it feels just barely warm, but not cold and not hot, you are probably close enough to the right temperature. Also, remember that the real action takes place with the heating pad overnight. The stove part is very preliminary.
Like I said, the low flame shown above takes about 15-20 minutes, with occasional stirring, to warm a gallon of milk from 'fridge cold' to 100. I will probably quit messing with the thermometer at all after a few more yogurt-makings.


Then, I transfer the pot of warm milk/cream over to the counter where I have set up the heating pad. I use a large cutting board and lots of extra towels in between all the parts. I'm all about protecting my countertop from the heating pad, even though it doesn't get that hot, really. I set the heating pad on medium.

I take the last bits of yogurt from the last batch I made and scrape it all up with the spatula. You only need a couple tablespoons, or no more than a 1/4 cup.

Add a cup or so of the warm milk from your pot and mix it up:

Pour the starter into the pot of warm milk/cream and mix it together:

Then I cover it with a couple more towels just to tuck those yummy little cultures in for the night, and then I go to bed. Or go read blogs for a while.

And you're done with Step 1! Easy!
2. Let the Yogurt Culture Overnight
When you come downstairs in the morning, it should look something like this:

My thermometer tells me that we're holding steady at right around 90 f.

And you're done with Step 2 - super easy!
3. Transfer it into the Strainer and Refrigerate
Here's where it gets interesting. My basic strainer setup is as follows: I have a large colander, which I prop up on some little supports I made from cutting up a bamboo chopstick. This is an optional step, but I think it helps the whey drain out more easily. Don't agonize over it if your colander is just sitting on the bottom of the bowl or dish. It will be fine. Trust me.

Line your colander with the thin cotton towel like this:

and then pour in the yogurt:

If I start with a full gallon of milk/cream, it just comes to the very top of my colander. Here it is a bit below because the gallon wasn't a full gallon at the beginning. They whey starts immediately streaming out:

Now the whole thing goes into the fridge, and you're done with Step 3.
4. Let the Whey Separate out During the Day
Here's what it looks like several hours later:

Look at all the whey that has separated out! Oh, and here's an important tip: tuck the ends of the towel into the dish, otherwise, through the miracle (not really) of capillary action (I think), the towel will wick the whey out of the yogurt and dribble it all over the inside of your fridge.
5. Move the Yogurt and Whey into Storage Containers
Now it's really thick, and at the same time ultra smooth and creamy. These photos don't do it justice.


Then it's just to transfer it into containers and enjoy!

I have also found some other links on making cream cheese, and sour cream, that I would like to try out. And here's one on home made ricotta cheese. I once tried making ricotta from all the leftover whey and it was a massive fail. These days I make protein smoothies with the whey and some protein powder. Given how fabulous this super thick yogurt is, it seems kind of anticlimactic to not have something just as amazing to make with the leftover whey. So, as I said earlier, if you have a way with whey, please share it in the comments.

Friday, May 7, 2010
Work in Progress: Glider!
I haven't been blogging much about works-in-progress. I guess I prefer to wait until something is finished and then unveil it all at once. This is not always true with my knitting projects, but tends to be the case with my furniture.
The current major WIP is just too exciting at this stage for me to keep to myself. I'm making a glider. Not the flying-through-the-air kind, but the sitting-with-a-cocktail kind. (This description prompted @TreyPeden to ask, "What would it take to get the flying-through-the-air-whilst-sitting-with-a-cocktail kind?" on twitter the other day. Kind of gave me something to think about there...)
Anyway, the glider got started the other week before my tooth got yanked, and has been on hold for a while. Here is an early progress shot, on 4/16:

So, what you see above is a couple of arm rests propped up by some scraps, and the long pieces between are going to support the seat. The plywood was to set in place and sit upon, to test out the height of the arms and angle of the seat. Here it is with the test seat in place:

Then it sat for a few weeks while I chilled out with my swollen jaw.

Finally today was the day! I got the seat frame all welded up:


And here it is with the seat and back set in place:

Those are temporary supports holding up the back.

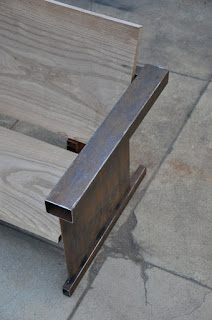
Closeup of the arm:


Now I have to:


I think I am going to use these for the 'swing' connection, from McMaster-Carr:


The current major WIP is just too exciting at this stage for me to keep to myself. I'm making a glider. Not the flying-through-the-air kind, but the sitting-with-a-cocktail kind. (This description prompted @TreyPeden to ask, "What would it take to get the flying-through-the-air-whilst-sitting-with-a-cocktail kind?" on twitter the other day. Kind of gave me something to think about there...)
Anyway, the glider got started the other week before my tooth got yanked, and has been on hold for a while. Here is an early progress shot, on 4/16:

So, what you see above is a couple of arm rests propped up by some scraps, and the long pieces between are going to support the seat. The plywood was to set in place and sit upon, to test out the height of the arms and angle of the seat. Here it is with the test seat in place:

Then it sat for a few weeks while I chilled out with my swollen jaw.

Not happy!
Finally today was the day! I got the seat frame all welded up:


And here it is with the seat and back set in place:

Those are temporary supports holding up the back.

Closeup of the arm:


Now I have to:
- Weld up some more supporting steel for the back
- Add a few more supports for the seat, perpendicular to the two long pieces that connect the arms
- Make the under-carriage (chassis?)
- Order some specialized parts which you will read about below
- Connect it all together
- Glide in comfort and style, bourbon in hand.

This one was at the Rose Bowl swap meet.


This one hangs out in back of the hardware store down the street from my house.


Closeups of the connections.
I think I am going to use these for the 'swing' connection, from McMaster-Carr:

This is a "Ball Joint Rod End"...

...and this is a "Threaded Connecting Rod"
Because the rod ends have a ball joint that can swivel a bit, instead of a rigid axial bearing, I won't have to worry so much if my bench and chassis aren't perfectly aligned. This is good, because it's not like I'm West Coast Choppers over here with loads of specialized equipment for precise alignment of moving parts. At some point here I'll give you all a tour of my workshop and you'll see what I mean. (Part of being a good designer is knowing when to allow for margin of error in order to get your design to do what you want it to do.)
Hopefully tomorrow I will make good progress on the chassis, but I might not make much progress on it at all. I have a basic idea in mind for how it will come together, but I am not entirely convinced of it, yet. As painful as it sounds (because the glider is looking sooooooo exciting already!!!!!) the chassis might need to marinate in my brain for a little bit longer. Maybe not. We'll see.
Plus, I have a special guest in the shop tomorrow -- a friend who is about to move away -- so who knows what will come of the day's work. It could be a madhouse of production, or it could just be relaxed and low-key.
Stay tuned for updates!
5/13/10 Update:
We had a really fun day and got a lot done. My special guest was none other than Justin Ketterer of Valuable Mechanisms. He is a design engineer, and it was really great to be able to talk about the mechanics of the movement of the glider with someone who was pretty well versed in things mechanical.
After we talked through some of my design issues with the undercarriage and gliding part of it, I decided I needed some more steel in different shapes than I had on hand, which called for a trip to Industrial Metal Supply. IMS is one of the better steel suppliers in the area, and they had exactly what I needed.
Then we got back home and made burgers for lunch (with delicious ground beef from you know where, which we also sampled raw, btw, and it was delicious). Then it was finally figuring out how the side supports would be configured, based on the new metal shapes.
Finally I got to fire up the Lincoln and we were off and welding.
Justin got to try out the welder too, and made a fine looking little, um, thing.
I didn't really get super far with the glider in terms of fabrication, but the ideas all got worked out, which is the hardest part. Once the problem is solved, it's only a matter of implementation.
Here are some pictures of the I-shaped end part of the glider base:


Shown here with my trusty Lincon in the background.
All in all, it was a super fun day, and I am bummed that Justin is moving away. If I could I would hire him in a heartbeat, and put him to work engineering some astounding, riveted(ing) titanium furniture. Oh well. Who knows what the future holds?
Best of luck to JK in his big move!
Wednesday, May 5, 2010
Anticlimax: Raw Milk Event Postponed
I was all ready. I was set. I was going to cover the Raw Milk Event for two blogs. Two! (Since my paleo-lifestyle posts here at C of P usually get cross-posted to Modern Paleo.)
Today having been primarily a work-from-home-in-an-old-comfy-t-shirt type of day, I had gone upstairs and had a brief wardrobe crisis due to lack of clean laundry (I almost tweeted "What does one wear to a Raw Milk Event?" but thought better of it). I didn't just want to show up in a shlumpy old t-shirt, if I was going to be a Reporter On The Scene. I settled on my red shirt since it wasclean festive and I was going to a Cinco de Mayo thing afterward. Then I found my camera, composed my list of questions, in case I forgot when I got there, and finally made it out the door for the 3-minute drive over to Figueroa Produce.
Upon arrival, I got rock star parking. Normally this would be seen as a Good Thing, but my immediate thought was more along the lines that this didn't particularly bode well as an indicator of strong attendance for the event. They weren't exactly lined up down the sidewalk or anything. I only tweeted this thing about a million times - where was everybody?
Then I saw it: there was a sign on the door. "Event canceled, we hope to reschedule soon." I had to read it like 5 times. Apparently Organic Pastures had canceled that morning. Wanting a better explanation of some kind, I went on in anyway, and, not seeing any of the owners hanging around the front area, headed back to the meat department.
I figured that if there wasn't going to be any raw milk sampling or raw milk information to be consumed, then I might as well gaze at the beautiful grass-fed beef in all it's glorious array.
Rick, the chief butcher peopleguy, was there. We chatted and he didn't seem to know much about the Raw Milk Event or why it had been canceled. By now, my disappointment was sinking in. I had been really excited to take pictures of the Raw Milk peopleguy in action, and check out the sample table, and explain in a really cool voice that I was covering the event for my blog (two blogs, actually).
I decided that some retail therapy was in order, of the grass-fed kind!
I checked over the meat in the case and there was a fantastic, thick chunk of gleaming red meat right there, calling to me. "What's that one?" I asked.
"Chuck" said Rick.
"Will you grind it for me?" I asked.
"Sure, no problem!" he answered.
That piece turned out to be 3 1/2 pounds, which was a little much. The piece next to it was only just over 2 lbs. and I settled for that instead.
He put it in the grinder. My gloom lifted as I watched it emerge from the nozzle. He expertly caught the whole mass of it with one hand, and put it back through a second time before he bagged it up and put the sticker on it and I was on my way.
I got home and pulled off a small hunk of the freshly ground chuck, salted it, and popped it into my mouth. I've always liked my beef rare, but I'm beginning to think that cooking it at all pretty much ruins it. (Plus it's a lot easier to eat this way when you've recently had a tooth pulled, which is my case.)
I guess if my big event for today isn't raw milk, the next best thing is a little raw grass-fed chuck. I'm still a little disappointed, but what can you do? Stay tuned for future updates...
Oh, and I almost forgot to mention, they are looking to hire a part-time butcher peopleguy, experienced only. If that's you, call Anthony, Luis, or Ruben at Figueroa Produce at 323-255-3663.
Today having been primarily a work-from-home-in-an-old-comfy-t-shirt type of day, I had gone upstairs and had a brief wardrobe crisis due to lack of clean laundry (I almost tweeted "What does one wear to a Raw Milk Event?" but thought better of it). I didn't just want to show up in a shlumpy old t-shirt, if I was going to be a Reporter On The Scene. I settled on my red shirt since it was
Upon arrival, I got rock star parking. Normally this would be seen as a Good Thing, but my immediate thought was more along the lines that this didn't particularly bode well as an indicator of strong attendance for the event. They weren't exactly lined up down the sidewalk or anything. I only tweeted this thing about a million times - where was everybody?
Then I saw it: there was a sign on the door. "Event canceled, we hope to reschedule soon." I had to read it like 5 times. Apparently Organic Pastures had canceled that morning. Wanting a better explanation of some kind, I went on in anyway, and, not seeing any of the owners hanging around the front area, headed back to the meat department.
I figured that if there wasn't going to be any raw milk sampling or raw milk information to be consumed, then I might as well gaze at the beautiful grass-fed beef in all it's glorious array.
Rick, the chief butcher peopleguy, was there. We chatted and he didn't seem to know much about the Raw Milk Event or why it had been canceled. By now, my disappointment was sinking in. I had been really excited to take pictures of the Raw Milk peopleguy in action, and check out the sample table, and explain in a really cool voice that I was covering the event for my blog (two blogs, actually).
I decided that some retail therapy was in order, of the grass-fed kind!
I checked over the meat in the case and there was a fantastic, thick chunk of gleaming red meat right there, calling to me. "What's that one?" I asked.
"Chuck" said Rick.
"Will you grind it for me?" I asked.
"Sure, no problem!" he answered.
That piece turned out to be 3 1/2 pounds, which was a little much. The piece next to it was only just over 2 lbs. and I settled for that instead.
He put it in the grinder. My gloom lifted as I watched it emerge from the nozzle. He expertly caught the whole mass of it with one hand, and put it back through a second time before he bagged it up and put the sticker on it and I was on my way.
I got home and pulled off a small hunk of the freshly ground chuck, salted it, and popped it into my mouth. I've always liked my beef rare, but I'm beginning to think that cooking it at all pretty much ruins it. (Plus it's a lot easier to eat this way when you've recently had a tooth pulled, which is my case.)
I guess if my big event for today isn't raw milk, the next best thing is a little raw grass-fed chuck. I'm still a little disappointed, but what can you do? Stay tuned for future updates...
Oh, and I almost forgot to mention, they are looking to hire a part-time butcher peopleguy, experienced only. If that's you, call Anthony, Luis, or Ruben at Figueroa Produce at 323-255-3663.
Saturday, May 1, 2010
Upcoming Raw Milk Event at Figueroa Produce
I just found out that there will be a special educational event on raw milk this week at Figueroa Produce. I shop there often, and wrote a separate post about them here. You can check out their website here.
The event will feature a powerpoint presentation by Mark McAfee, founder of Organic Pastures Dairy Company. The event is free and will feature free samples. Here is the info from the flyer at the store:
I have purchased Organic Pastures raw milk on more than one occasion, and found it incredibly wholesome and delicious. Raw milk advocates argue that it is healthier than regular milk, and that it contains beneficial nutrients and properties that are destroyed in the processing that regular commercial milk undergoes.
Currently, the FDA seems to have stepped up its war against raw milk producers. The truth is that individuals are capable of making their own choices about what is good for them and what is not, and they (we) have the right to make such decisions for ourselves, and we have the right to buy from and sell to each other freely, by mutual consent and to mutual advantage, without government intervention or coercion. The FDA is in violation of these rights when it seeks to ban products like raw milk from the marketplace (in fact, the FDA is in violation of these rights by its very existence.)
Also, consider that regular milk can be produced under unsanitary conditions that make it drinkable only after it has been processed; whereas raw milk can only be successfully produced and sold under extremely sanitary and healthful conditions (otherwise, you would open the bottle, take a whiff of the contents, and promptly empty it down the drain.) I'm not saying that all regular milk is produced under unsanitary conditions, but is does give one pause to consider the implications of this difference.
I'm looking forward to the presentation, and will give a full report here at C of P next week!
The event will feature a powerpoint presentation by Mark McAfee, founder of Organic Pastures Dairy Company. The event is free and will feature free samples. Here is the info from the flyer at the store:
Location: Figueroa Produce Market, 6312 North Figueroa St., Los Angeles, CA 90042
Phone: 323-255-FOOD (3663)
Date: May 5th, 2010 (Wednesday)
Time: 5:00 p.m.
Come learn how to build and nourish your immune system through raw milk! Share the Secret is an exciting Raw Milk educational outreach program provided free to the public by Organic Pastures Dairy company and its founder Mark McAfee.
Share the Secret combines colorful power-point presentation, free raw milk samples and high energy speaking...to enlighten and inform. Armed with the truth and knowledge your health will never be the same again. Join the 50,000 raw milk consumers in CA that have made this choice and have never looked back.
I have purchased Organic Pastures raw milk on more than one occasion, and found it incredibly wholesome and delicious. Raw milk advocates argue that it is healthier than regular milk, and that it contains beneficial nutrients and properties that are destroyed in the processing that regular commercial milk undergoes.
Currently, the FDA seems to have stepped up its war against raw milk producers. The truth is that individuals are capable of making their own choices about what is good for them and what is not, and they (we) have the right to make such decisions for ourselves, and we have the right to buy from and sell to each other freely, by mutual consent and to mutual advantage, without government intervention or coercion. The FDA is in violation of these rights when it seeks to ban products like raw milk from the marketplace (in fact, the FDA is in violation of these rights by its very existence.)
Also, consider that regular milk can be produced under unsanitary conditions that make it drinkable only after it has been processed; whereas raw milk can only be successfully produced and sold under extremely sanitary and healthful conditions (otherwise, you would open the bottle, take a whiff of the contents, and promptly empty it down the drain.) I'm not saying that all regular milk is produced under unsanitary conditions, but is does give one pause to consider the implications of this difference.
I'm looking forward to the presentation, and will give a full report here at C of P next week!
Subscribe to:
Posts (Atom)